
Why Does Choosing the Right Applicator Matter for Diamond Painting?
Diamond painting is a creative hobby that combines patience, concentration, organization, and artistic expression. Each design is completed by placing tiny resin drills onto matching symbols printed on an adhesive canvas. Although the process may appear simple, completing a detailed picture can involve thousands of repeated movements, which makes the quality and comfort of the equipment especially important. The applicator is one of the most frequently used tools because it helps lift individual drills from a tray and transfer them to their correct positions. A poorly suited tool can make repetitive work feel awkward, while a comfortable and well-balanced option can make the activity more enjoyable. Beginners sometimes spend considerable time choosing a beautiful canvas but give little attention to the equipment they will hold throughout the project. It is worth considering grip, weight, tip design, material, and compatibility before selecting an applicator. These details can influence how easily drills are handled and how confidently someone works through detailed sections. The right equipment does not automatically create perfect artwork, but it can support a smoother process and help crafters concentrate on the creative experience instead of struggling with uncomfortable tools.
What Is a Diamond Painting Tools Pen and What Does It Actually Do?
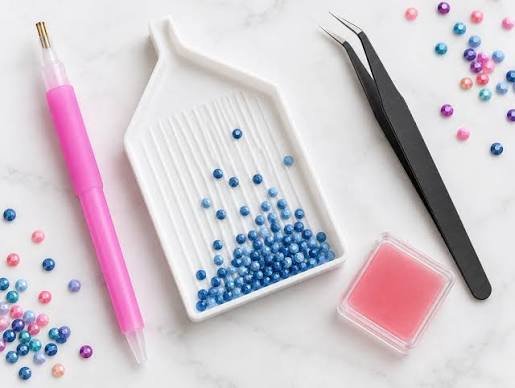
A Diamond Painting Tools Pen is a handheld applicator designed to pick up small resin drills and place them onto the adhesive surface of a canvas. Most traditional models have a narrow tip with a small opening that holds wax or another compatible pickup material. The material creates temporary tackiness, allowing the tip to lift a drill from the tray without requiring the crafter to handle each piece with their fingers. Once the drill is positioned over the matching symbol, gentle pressure transfers it to the adhesive surface. The pickup material then releases the drill so the applicator can return to the tray for another piece. This simple process is repeated throughout the project, making the tool an essential part of the working routine. Some models are designed for individual placement, while others accept wider attachments that can transfer multiple drills together. There are also specialty versions with ergonomic grips, decorative finishes, built-in lighting, and alternative pickup mechanisms. Understanding the basic function makes it easier to compare different designs and decide which features are genuinely useful. A suitable tool should feel comfortable, pick up drills reliably, and allow controlled placement without requiring unnecessary pressure or complicated handling.
Which Different Applicator Styles Are Available for Diamond Painting?
Crafters can choose from several applicator styles, each offering a different approach to placing drills. The standard single-placer is the simplest design and is commonly included in beginner kits. It picks up one drill at a time and provides direct control when working on detailed sections. Multi-placer attachments have wider tips that can transfer several drills in one movement, making them useful for large areas containing repeated colors. Ergonomic models feature thicker barrels, shaped grips, or soft coverings intended to make holding the tool more comfortable. Decorative resin and acrylic models offer colorful patterns and distinctive finishes for people who enjoy personalized accessories. Some specialty designs include small lights that improve visibility around the working tip, while electric vacuum models use suction to lift drills instead of traditional wax. Refillable versions may also provide a different way to store pickup material. These options are not interchangeable in every situation because each has strengths and limitations. A beginner may find a standard model sufficient, while someone who completes large canvases may appreciate additional attachments. The best approach is to understand the purpose of each style and choose equipment that matches the projects, working habits, and comfort preferences of the individual crafter.
How Can a Standard Single-Placer Support Beginners?
A standard single-placer is often the easiest applicator for someone learning diamond painting because its design is simple and its purpose is straightforward. The narrow tip picks up one drill at a time, allowing the user to concentrate on identifying the correct symbol and positioning each piece carefully. This approach is particularly useful when working with small details, narrow outlines, scattered symbols, and areas where different colors appear close together. Most beginner kits include a basic plastic version, so new crafters can start practicing without purchasing additional accessories. The single-placement method also helps people understand how pickup material works and how much pressure is needed to transfer a drill. Although placing each piece individually may take longer than using a multi-placer, it provides excellent control over individual positions. Beginners can develop a consistent rhythm by checking the symbol, lifting the correct color, and placing the drill with a steady movement. As their confidence improves, they can experiment with wider attachments while retaining the careful technique learned through individual placement. A simple applicator should never be dismissed as an outdated option because it remains useful for detailed work even when someone owns several specialty tools.
When Should You Use a Multi-Placer Attachment?
A multi-placer attachment is designed to pick up and transfer several matching drills in a single movement. It is especially useful when a canvas contains large sections of one color or repeated symbols arranged in straight rows. Rather than picking up every drill individually, the crafter can arrange several pieces in the sorting tray, align the wider tip with them, and lift them together. Different attachment widths are available, allowing users to choose how many drills they want to transfer at once. Smaller multi-placers can be easier for beginners to control, while wider versions may help experienced crafters cover larger sections more quickly. However, using one requires preparation and careful alignment. The drills need to sit neatly in the tray, and the attachment must match the spacing of the symbols on the canvas. If the pieces are uneven, the transferred row may also require correction. Multi-placers are less convenient around small details, curves, and areas containing scattered colors. Many experienced users keep a single-placer available for those situations. Switching between individual and multiple placement techniques makes it possible to balance speed and precision throughout the same project.
Why Is Grip Comfort Important During Long Crafting Sessions?
Comfort should be a major consideration when selecting an applicator because diamond painting involves repeating small movements over an extended period. A narrow or slippery barrel may feel acceptable at first but become uncomfortable when the fingers repeatedly hold it in the same position. Some crafters prefer a thicker body because it gives their fingers a wider surface to hold, while others feel more comfortable using a lightweight and narrow design. Soft foam grips can provide cushioning, and silicone sleeves may offer a different texture that helps prevent slipping. Built-in ergonomic shapes are also available, although their comfort depends on the user’s hand size and preferred holding position. It is important not to assume that every product described as ergonomic will automatically feel suitable. If possible, hold the tool before purchasing it and notice whether the fingers rest naturally around the barrel. The grip should allow the applicator to move without requiring constant squeezing. A comfortable tool can make repetitive work feel less distracting and help the crafter maintain a steady routine. Taking short breaks and adjusting hand position are also sensible habits, especially during larger projects that require many hours of attention.
What Materials Are Used to Make Diamond Painting Applicators?
Applicator bodies are manufactured from different materials, including plastic, acrylic, resin, wood, and metal. Basic plastic models are common in starter kits because they are lightweight and inexpensive to produce. Acrylic and resin versions are popular among people who enjoy decorative crafting accessories because they can feature colorful patterns, glitter effects, transparent finishes, and unusual designs. Wooden bodies offer a natural appearance and may provide a different surface texture. Metal models can feel solid and durable, although their weight may not suit every user. Each material has its own practical considerations. A lightweight plastic barrel may be easy to handle but feel too thin for someone who prefers a wider grip. A metal body may feel substantial but become tiring if it is heavier than expected. Resin can offer attractive designs, but the shape and balance should still be checked. Material alone does not determine whether an applicator is comfortable or reliable. The finish, connection between the barrel and tip, overall balance, and quality of construction also matter. Crafters should choose a design that feels suitable during actual use rather than selecting equipment only because it looks attractive in a product photograph.
How Does an Ergonomic Design Support Better Control?
An ergonomic design aims to make a handheld tool easier to hold and move during repeated activity. In diamond painting, this may involve a thicker barrel, a contoured grip, a soft sleeve, or a shape that provides a natural resting place for the fingers. These features can help some crafters avoid gripping a narrow applicator too tightly. A wider body may be especially appealing to people who find standard plastic tools difficult to hold comfortably. However, ergonomic preferences are personal. Someone with smaller hands may prefer a slim design, while another crafter may feel more secure with a broader grip. The position of the grip also matters because it should allow the fingers to rest where they naturally support the tool. A surface that is too smooth may slide during use, while a very rough texture may feel distracting. It is helpful to test a grip during a short practice session before deciding whether it suits a regular routine. A comfortable shape should support controlled movement without forcing the wrist or fingers into an unnatural position. Ergonomic equipment is most valuable when it addresses a genuine comfort issue instead of simply adding another feature to the product description.
Does the Weight of an Applicator Affect Placement Accuracy?
Weight can influence the way an applicator feels during repeated placement, but a heavier model is not automatically more accurate. Lightweight tools are easy to move and may feel convenient during quick sessions. Some users, however, prefer a little more weight because it gives the body a solid feeling in the hand. Very heavy models may become tiring when used for long periods, particularly if their balance is concentrated near the tip or one end of the barrel. Balance is therefore just as important as total weight. A well-balanced applicator should move naturally without requiring the fingers to make constant corrections. The best way to assess weight is to hold the tool in a normal working position and imitate the movement used to pick up and place a drill. Notice whether the fingers remain relaxed and whether the tip follows the intended direction. If the tool feels awkward after only a short test, it may not become more comfortable during a longer project. Personal preference should guide the decision because different users have different hand sizes, grip habits, and working speeds. Choosing a manageable weight can help make the crafting routine feel more natural.
How Should You Load Wax Into a Traditional Applicator?
Wax is a common pickup material used with traditional applicators. It is usually supplied as a small pad or block protected by a thin covering that must be removed before use. To load the tip, gently press its opening into the exposed wax so that a small amount enters the hollow area. The aim is to provide enough tackiness to lift a drill without filling the opening with unnecessary material. Pressing too deeply may push excess wax into the tip and make clean release more difficult. After loading, touch the tip to the upper surface of a drill in the sorting tray and lift it carefully. If the drill does not remain attached, check whether the tip contains enough pickup material and whether the wax is still suitable for use. Different products may have slightly different textures, so following the manufacturer’s instructions is sensible. Once loaded correctly, the applicator should pick up drills smoothly until the wax needs refreshing. Avoid using household adhesives or unrelated sticky products because they may leave unwanted residue. A small amount of suitable material is usually enough for normal placement, and careful loading helps keep the tip working consistently.
Can Putty and Alternative Pickup Materials Replace Wax?
Traditional wax is not the only material used to pick up diamond drills. Some crafters prefer specially designed putty or reusable compounds that provide temporary tackiness at the tip. These alternatives may have different textures and levels of grip, so the experience can vary between products. Certain users enjoy putty because it may feel consistent during repeated pickup, while others prefer the familiar handling of a standard wax pad. Some refillable applicators are designed to hold pickup material inside the barrel, which can reduce the need to handle separate pieces during a session. It is important to choose materials intended for diamond painting rather than using household glue or other unsuitable adhesives. A material that is too sticky may hold onto a drill when the crafter tries to release it. A material that is too weak may allow pieces to fall before reaching the canvas. Testing a small amount before beginning a large project helps determine whether the pickup material works well with the chosen tip. Users should also consider how easy it is to clean and replace. The most suitable option is one that provides reliable pickup without creating unnecessary residue or making placement more complicated.
Why Are Interchangeable Tips Useful for Different Projects?
Interchangeable tips allow one applicator body to support more than one placement method. A crafter can attach a narrow single-placer for detailed sections and switch to a wider multi-placer when filling a large area containing repeated colors. Some sets include several widths, straightening attachments, and specialty ends intended for particular tasks. This flexibility can reduce the need to keep several complete tools on the table. However, compatibility must be checked before purchasing additional tips. Not every attachment fits every barrel, and connection styles can differ between manufacturers. A threaded attachment must match the connection size, while a push-fit design needs a suitable opening and secure fit. A loose tip may move during placement and make controlled work more difficult. Before beginning a project, check that the attachment is properly connected without applying unnecessary force. Store unused tips in a small container so that they do not become mixed with loose drills or other supplies. Interchangeable equipment is most helpful when the crafter understands the purpose of each attachment. Selecting a suitable tip for the current section can make the working process more efficient while keeping the overall setup simple and organized.
Are Electric Vacuum Applicators Worth Considering?
Electric and vacuum-style applicators use suction to lift drills instead of relying on traditional wax. Depending on the model, the user may activate the pickup mechanism with a button and release the drill onto the canvas after positioning it. This method may appeal to people who dislike repeatedly loading wax or who want to experiment with a different technique. Some versions are rechargeable or use replaceable batteries, so power requirements should be reviewed before purchase. Specialty models may also include different tip sizes or suction settings. However, electric equipment is not automatically faster or more accurate for every project. Some crafters prefer the direct feel of a traditional applicator, while others enjoy the convenience of suction-based pickup. The price may also be higher than that of a standard plastic tool. Before purchasing, consider how frequently the device will be used, whether replacement parts are available, and whether the controls feel comfortable. Someone who completes occasional small designs may find a basic applicator entirely suitable. A frequent crafter may be more interested in comparing specialty equipment. The best choice depends on personal preferences, practical needs, and the type of artwork being completed.
How Can a Lighted Applicator Improve Visibility?
Some applicators include a small built-in light that illuminates the area near the tip. This feature may help when working with small symbols or colors that are difficult to distinguish under ordinary room lighting. Better visibility can make it easier to identify the correct position before placing a drill, especially on detailed canvases containing several similar shades. However, a built-in light covers only a limited area and should not be treated as a replacement for suitable room lighting. Its usefulness depends on brightness, angle, battery life, and the position of the light relative to the tip. Crafters should also consider whether the added components increase the weight or make the barrel less comfortable to hold. A separate light pad may be a better choice for someone who wants a larger illuminated area beneath the canvas. Before choosing a lighted model, consider the usual crafting environment and whether visibility is a genuine difficulty. The feature can be helpful when it solves a practical problem, but it may be unnecessary for people who already have a well-lit workspace. Good lighting should support clear symbol recognition without creating glare or discomfort.
How Do Round and Square Drills Change the Placement Technique?
Round and square drills have different shapes, which can influence the way a crafter approaches placement. Round drills have curved edges and do not need to touch neighboring pieces in exactly the same way as square drills. Square drills are designed to sit closely together, creating a more compact appearance when their rows are aligned. A single-placer can be used with both shapes when the tip is suitable for the drill size. Multi-placer attachments can also be useful, although careful arrangement in the sorting tray becomes important. Square designs may require additional attention to straight rows because uneven placement can be more noticeable across a large area. Round designs can offer a slightly different visual effect because small spaces may remain between neighboring pieces. Some crafters use a straightening tool to adjust rows after placement. Before purchasing specialty attachments, check the manufacturer’s compatibility information. The most useful tip is one that picks up drills reliably and releases them without disturbing nearby pieces. Understanding the difference between drill shapes helps users choose equipment and techniques that support the finished appearance they want to achieve.
What Is the Most Comfortable Way to Hold an Applicator?
A relaxed grip is usually more helpful than holding the applicator tightly. Many crafters position the barrel between the thumb and index finger while allowing the middle finger to provide support. The remaining fingers can rest naturally instead of squeezing the tool. The exact position may vary according to the shape of the barrel and the user’s preferred working style. The tip should approach the drill at a comfortable angle, allowing the crafter to lift it without forcing the wrist into an awkward position. When transferring a piece, use a controlled movement and apply only enough pressure to place it on the adhesive canvas. Excessive pressure can make the process less comfortable and may cause a drill to move out of alignment. It is also helpful to keep the wrist relaxed and avoid raising the shoulders unnecessarily. If the grip begins to feel tense, pause and adjust the hand position. There is no single holding method that suits every person, so small experiments can help identify a natural technique. Comfort, stability, and control should guide the choice rather than copying another crafter’s exact hand position.
How Can You Develop More Accurate Drill Placement?
Accurate placement begins before the applicator touches the canvas. First, identify the correct symbol and compare it with the color reference provided for the design. Arrange the drills in the sorting tray so their upper surfaces are easy to reach. Keep the tray close enough that the hand does not need to travel an uncomfortable distance between pickup and placement. Lift a drill from its upper surface, then move the applicator toward the matching adhesive area with a controlled motion. For individual placement, focus on one symbol at a time rather than rushing through a section. For multi-placement, arrange the drills in a neat row and check that the attachment width matches the available space. If a piece lands slightly out of position, use a suitable correction tool to adjust it gently. Good lighting, a clean work surface, and an organized tray all support accuracy. Consistency usually develops through practice rather than speed, so beginners should prioritize controlled movements. It is also useful to check completed sections occasionally to identify missing pieces or areas that may need adjustment. Developing a steady routine can make the process more predictable and enjoyable.
Why Should You Clean the Tip After Regular Use?
The tip is the part of the applicator that directly contacts pickup material and drills, so keeping it clean helps maintain reliable performance. Over time, old wax, dust, fibers, and small pieces of debris may collect around the opening. This buildup can affect how the tool picks up and releases drills. A quick inspection before each session can help identify residue before it becomes difficult to remove. If the tip is designed to hold wax, carefully remove old material when it no longer works properly. Use a suitable small cleaning tool or follow the manufacturer’s instructions, taking care not to bend or damage the opening. Avoid pushing sharp objects aggressively into the tip because a damaged opening may no longer hold pickup material correctly. The outside of the applicator can often be wiped with a soft cloth, depending on its construction. Do not soak electronic or decorative components unless the product instructions specifically allow it. Regular gentle care is more useful than waiting until the tool becomes heavily clogged. A clean tip supports more consistent pickup and helps prevent old residue from interfering with the placement process.
What Should You Do When the Applicator Stops Picking Up Drills?
A tool that suddenly stops picking up drills may have several possible problems. One common reason is that the pickup material has worn out or become too dry to hold a drill. Refreshing the wax or replacing the material may restore its grip. Another possibility is that old residue, lint, or dust has collected around the opening and is preventing the tip from making proper contact. A bent or damaged attachment can also make pickup unreliable. Sometimes the problem is not the applicator itself. Drills may be sitting upside down in the tray, making it difficult for the tip to contact their upper surfaces. Check each part separately instead of immediately replacing the entire tool. Inspect the opening, refresh the pickup material, arrange the drills face up, and test the applicator on a small area. If the attachment feels loose, secure it according to the product instructions. These simple checks can help identify the cause without wasting supplies. When a component is genuinely damaged, replacing that part may be more practical than attempting an unsuitable repair. Careful troubleshooting can save time and help keep the rest of the project moving.
How Can You Use Multi-Placer Attachments More Consistently?
Using a multi-placer requires more preparation than placing individual drills. Begin by choosing an attachment width that matches the available space and the number of consecutive symbols. Arrange the drills in the sorting tray by gently moving them until their flat sides face upward and their rows sit close together. Load the attachment with the recommended amount of pickup material, then align it with the row of drills. Use a controlled movement to lift the pieces together. Before transferring them to the canvas, check that they remain evenly positioned along the attachment. Place the row over matching symbols and apply gentle, even pressure. If one drill is missing or out of position, correct it individually instead of forcing the entire row into place. Larger attachments may save time, but they also require more careful alignment. Beginners can start with a smaller multi-placer and gradually experiment with wider options as their confidence improves. Keeping a single-placer nearby is useful because detailed sections and isolated symbols still require individual attention. A combination of both techniques can make the working process more flexible and help prevent unnecessary mistakes.
Should Beginners Purchase an Expensive Applicator Immediately?
Beginners do not need to purchase an expensive specialty tool before learning the basic process. Most standard kits include an applicator, wax, and a sorting tray, which are enough to complete an initial project. Starting with the supplied equipment helps new crafters understand whether they enjoy the activity and which parts of the process feel comfortable. After completing a few sections, they may discover that the original barrel feels too thin, that they would prefer a wider grip, or that a multi-placer could make large color areas easier. Those observations provide a clearer reason to upgrade. Buying several accessories before understanding personal preferences can lead to unnecessary spending and unused supplies. A sensible approach is to begin with the basic tool, identify any genuine difficulties, and then choose one improvement that addresses them. A comfortable grip or an additional tip may be more useful than an entire premium set. The goal is not to own the largest collection of equipment but to have tools that support enjoyable and consistent crafting. A simple setup can remain useful for many projects, even after someone becomes more experienced.
How Can Left-Handed Crafters Arrange Their Workspace?
Left-handed crafters can use many standard applicators because most basic designs do not require a specific dominant hand. However, the arrangement of the workspace and the direction of movement may influence comfort. A sorting tray placed on the preferred side can reduce unnecessary reaching, while the canvas should be positioned so the working hand does not repeatedly rest on exposed adhesive areas. Some users find it helpful to complete sections in a direction that keeps their hand away from recently placed drills. The most suitable direction depends on the canvas layout, the dominant hand, and the person’s working position. Left-handed users should also check whether a specialty grip or angled attachment is designed for a particular orientation. Most simple cylindrical barrels can be held with either hand, but unusual shapes may feel different. Lighting should be positioned so the hand does not cast a shadow over the symbols. Small adjustments to the table, tray, and canvas can make the process feel more natural. There is no need to force a technique designed for someone else. A comfortable workspace should support the user’s natural movements and allow the applicator to be controlled easily.
How Should You Store Applicators Between Crafting Sessions?
Proper storage helps protect the tip and keeps small accessories from becoming lost. After finishing a session, remove loose residue from the applicator if necessary and place it somewhere clean and dry. A pen holder can keep the tip from rubbing against other tools, while a small storage case can protect decorative bodies from scratches. Interchangeable attachments should be placed in a labeled container or compartment where their sizes can be identified easily. Avoid leaving the applicator underneath heavy objects because pressure could damage the tip or loosen its connection. If the tool uses batteries or an electronic pickup mechanism, follow the manufacturer’s instructions for switching it off and storing it safely. Wax pads and putty should also be protected from dust and lint because contamination can reduce their usefulness. Keeping accessories organized makes it easier to begin the next session without searching through trays and containers. A simple storage routine can protect equipment and help maintain a tidy crafting space. It is also useful to keep replacement tips and pickup materials separate from completed artwork so that small accessories do not become mixed with finished pieces or loose drills.
Which Accessories Work Well Alongside an Applicator?
An applicator is only one part of a useful diamond painting setup. A sorting tray helps arrange drills so they can be picked up easily, while wax or another compatible pickup material allows a traditional tip to grip them. Tweezers can help remove misplaced pieces, and a straightening tool may assist with aligning rows of square drills. A light pad can improve visibility by illuminating symbols beneath the canvas, especially when the printed design contains small or similar-looking markings. Storage containers keep colors separated and reduce the chance of accidental spills. Some crafters also use a holder to prevent the applicator from rolling off the table when they pause. A protective cover or suitable release paper can help keep unused adhesive areas clean. These accessories are optional, and not every project requires all of them. It is better to select items according to actual needs than to purchase a large collection at once. A well-organized basic setup can support a smooth working process without making the table unnecessarily crowded. Each accessory should have a practical purpose, whether that is improving visibility, keeping drills organized, supporting accurate placement, or making the workspace easier to manage.
How Can You Build a Practical Collection of Applicator Tools?
A useful collection does not need to contain dozens of applicators. Many crafters can manage most projects with one comfortable single-placer and one multi-placer attachment. Someone who enjoys switching between different designs may prefer an additional barrel so that separate tips remain ready for use. A spare basic applicator can also be helpful if the main tool becomes damaged or misplaced during a project. When choosing additional equipment, think about the types of artwork completed most often. Detailed images may require more individual placement, while designs with broad sections of matching colors may benefit from wider attachments. Decorative bodies can make a collection more personal, but practical compatibility should remain a priority. Keep the tools that genuinely improve the experience and avoid buying duplicates that perform exactly the same function without adding value. Over time, a small collection can develop naturally as new preferences become clear. The purpose of having several options is to make the process easier, not to create unnecessary complexity. A carefully selected collection can support different techniques while keeping the workspace organized and the purchasing decisions sensible.
What Maintenance Habits Can Help Extend Tool Life?
A simple maintenance routine can help an applicator remain dependable throughout many projects. Before beginning, inspect the tip for old wax, lint, or visible damage. During a session, refresh the pickup material when drills begin slipping instead of pressing harder to compensate. At the end, remove excess residue and store the tool in a protected location. If the attachment can be removed, check the connection occasionally to make sure it remains secure. Clean the barrel according to its material and the manufacturer’s care recommendations. Decorative resin, wood, metal, and electronic models may require different handling, so one cleaning method should not be assumed suitable for every product. Keep wax and putty covered when not in use, and avoid placing the tip directly on dusty surfaces. If an attachment becomes bent or its opening is damaged, replacing it may be safer than trying to reshape it. Consistent attention to small details helps prevent avoidable problems and keeps the equipment ready for future crafting sessions. These habits do not need to take much time. A short inspection and careful storage after each session can make the entire setup easier to maintain.
How Can You Choose Equipment That Matches Your Crafting Style?
The most suitable equipment depends on how you approach diamond painting. Someone who enjoys small, detailed designs may prefer a narrow single-placer with a lightweight body. A crafter who completes large canvases may appreciate a thicker grip, interchangeable attachments, and a multi-placer for broad color sections. People who like decorative supplies may be drawn to colorful resin designs, while those who prefer a simple setup may be satisfied with a standard plastic model. Consider how often you paint, how long your sessions usually last, and whether you value speed, comfort, appearance, or flexibility most. Read product details carefully and check the dimensions, material, attachment compatibility, and included accessories. Customer photographs can sometimes help show the actual size and finish more clearly than a product description alone. If possible, test the grip before committing to a purchase. A thoughtful choice should solve a real problem or make the activity more enjoyable. There is no universal winner because each crafter has different hands, habits, and creative goals. Selecting equipment according to personal needs is more useful than choosing a product simply because it is popular.
What Should You Check Before Buying a New Applicator?
Before buying an applicator, review the features that will affect everyday use. Check the overall length and barrel thickness to make sure the body is likely to fit comfortably in your hand. Look at the tip material and connection style, especially if replacement attachments may be needed later. If the product includes a multi-placer, confirm which widths are supplied and whether they are compatible with your preferred drill shapes. For electric or lighted designs, review battery requirements, charging arrangements, and operating instructions. Examine the finish for rough edges and consider whether the surface will be easy to keep clean. Also check what is included in the package because some product photographs show wax, storage cases, or extra tips without including every item. A clear understanding of the listing can prevent disappointment after delivery. Price should be considered alongside construction, comfort, and useful features rather than treated as the only measure of quality. Reading customer feedback may also help identify recurring comments about grip, balance, durability, and attachment compatibility. Choosing carefully can help ensure that the tool supports your projects instead of becoming another accessory that remains unused.
How Can the Right Equipment Make Diamond Painting More Enjoyable?
Diamond painting is meant to be a rewarding creative activity, and the equipment should support that experience. A suitable applicator can make repeated placement feel smoother, while a comfortable grip helps the crafter maintain a natural hand position. The right attachment can also make it easier to move between detailed sections and larger areas without changing the entire working setup. Clean pickup material, organized drills, and good lighting all contribute to a more consistent process. However, no tool can replace patience and practice. Even a premium applicator requires the user to identify symbols correctly, arrange drills carefully, and place each piece with attention. Beginners should allow themselves time to learn rather than expecting perfect results immediately. As skills develop, preferences may change, and equipment that once felt suitable may eventually be replaced by a different style. The most useful setup is one that fits the current project and makes the crafter look forward to continuing. With thoughtful choices and regular care, a simple collection of tools can support many satisfying creative sessions and help make the hobby a relaxing part of everyday life.
How Can You Create a Workspace That Supports Better Results?
A well-arranged workspace can make diamond painting more comfortable and help prevent small interruptions. Begin with a stable table that provides enough room for the canvas, sorting tray, applicator, and other supplies. Position the canvas so the active section is easy to reach without stretching the arm or leaning forward excessively. Keep the tray close to the working hand and arrange colors in a way that makes them easy to identify. Good lighting is important because clear symbols help reduce mistakes and unnecessary checking. Some crafters prefer a light pad, while others use a desk lamp positioned to illuminate the canvas without creating glare. Store unused drills in labeled containers so colors do not become mixed. Keep pickup materials covered when they are not being used, and place the applicator in a holder during breaks. A tidy setup does not need to be expensive or complicated. Even small changes, such as moving the tray closer or improving the light source, can make a noticeable difference to the working routine. The aim is to create an environment where tools are easy to reach and attention can remain on the artwork.
How Can Practice Help You Get More From Your Applicator?
Practice is one of the most effective ways to become comfortable with any applicator. New users may initially find it difficult to pick up drills consistently, recognize symbols quickly, or place pieces in straight rows. These skills usually become more natural as the same movements are repeated. Beginners can start with a small section of the canvas and focus on controlling one movement at a time. Practice picking up drills from the tray without pressing too hard, then transfer them to matching symbols using a steady hand. Once individual placement feels familiar, try a small multi-placer section and compare the experience. Notice whether the attachment is easy to align and whether the drills remain evenly positioned. If a technique feels awkward, adjust the grip or return to a simpler method. There is no reason to rush through the learning process. Taking breaks and checking completed areas can help identify habits that need improvement. Over time, the crafter can develop a personal routine that combines comfort, organization, and accuracy. The purpose of practice is not to work as quickly as possible but to become confident and enjoy the activity.
Where Can You Find Inspiration for Your Next Crafting Setup?
Building a personal crafting setup can be an enjoyable part of the hobby. Some people prefer a minimal arrangement with one applicator, a tray, and a small amount of wax, while others enjoy exploring decorative pens, colorful storage, specialty attachments, and coordinated accessories. Inspiration can come from completed artwork, crafting communities, product demonstrations, and techniques shared by other diamond painters. When exploring new ideas, focus on how a tool is actually used rather than choosing it only because it looks attractive in a photograph. Notice whether the design improves comfort, helps with alignment, or makes a particular task easier. It is also useful to compare several options before deciding which features matter most. Keeping notes about favorite grips, tip sizes, and pickup materials can make future purchases more intentional. Every crafter develops a slightly different routine, and there is no need to copy another person’s entire setup. Experimenting gradually allows the workspace to grow in a practical way while preserving the enjoyment that makes the hobby special. A personal collection can reflect individual taste while remaining focused on useful equipment and comfortable working habits.
How Can the Right Applicator Become Part of Your Creative Routine?
A dependable applicator becomes an important part of the routine because it connects every stage of the process, from picking up a drill to placing it on the canvas. Once a crafter finds a comfortable shape and a suitable tip, repeated movements can become more natural and less distracting. A consistent setup also makes it easier to concentrate on color patterns, artwork details, and the progress of the design. Keeping the tool clean, storing it carefully, and using the right pickup material can help maintain reliable performance across multiple projects. There is no need to upgrade constantly or purchase every new accessory available. Instead, choose equipment that supports the way you enjoy crafting and make changes only when they provide a meaningful benefit. Exploring different styles can still be part of the fun, particularly when decorative designs add personality to a collection. A thoughtful approach to equipment selection helps keep the hobby enjoyable and organized. For crafters looking for inspiration, useful supplies, and creative ways to enjoy this activity, One Woman too Many Diamonds offers a place to explore diamond art and make every project feel like a personal expression of creativity.
About the Author